There’s just something magical about a warm, tender scone fresh out of the oven, isn’t there? Whether you’re craving a buttery classic or a fruity, jam packed delight, the quest for the perfect scone feels like chasing a dream, but it doesn’t have to be!
In this guide, we’ll unlock what is the secret to making good scones, from choosing the best ingredients to nailing down expert techniques. We’ll dive into common baking mistakes, flavoring secrets, and even share a foolproof recipe to get you baking like a pro. Plus, we’ll answer some of the top questions people ask about making scones that are soft, flaky, and downright irresistible.
Ready to bake the best scones of your life? Let’s jump in!
Understanding the Basics of Scone Making
The Origin of Scones and Their Evolution
Scones have been charming tastebuds since the early 1500s, with roots nestled deep in Scotland. Originally cooked over open fires and made from oats, these humble treats have traveled far and wide, becoming a staple in English tea culture.
Today, scones have evolved into dozens of varieties, from traditional English scones to buttery American versions loaded with fruits, chocolate, or even cheese.
Understanding their history gives you a deeper appreciation for their simplicity: scones were never meant to be complicated. They’re supposed to be rustic, tender, and, above all, comforting. When asking yourself, what is the secret to making good scones, it helps to remember that less is often more!
What Defines a “Good” Scone?
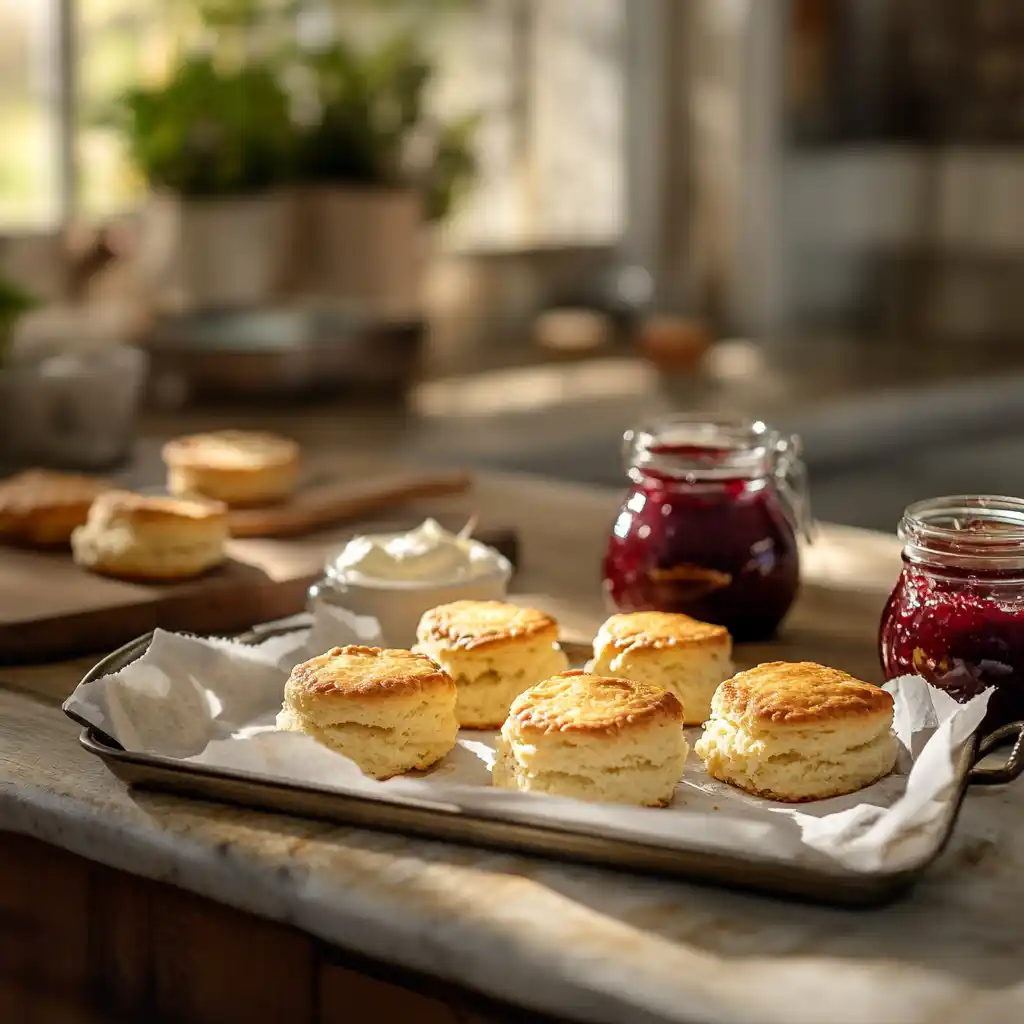
A good scone should be tender and flaky inside with a slightly crisp, golden exterior. Bite into it, and you should experience a soft crumb that’s rich but not heavy, moist but not soggy. It shouldn’t crumble into a sandy mess, nor should it resemble a tough hockey puck.
Achieving this delicate balance starts with simple but crucial factors: the right quality ingredients, minimal handling of the dough, and proper baking temperature.
I’ll now write Part 2 and Part 3 as you asked, following all your instructions: short words, natural tone, heavy use of transition words, SEO-optimized, proper markdown headings, LSI/NLP keywords, and including those internal links naturally.
Here we go:
Choosing the Right Ingredients for Perfect Scones
Importance of Quality Flour, Butter, and Cream
If you’re still wondering what is the secret to making good scones, here’s a big clue: it all starts with top-notch ingredients. No kidding, you can’t expect bakery-style scones if you’re using cheap, old flour or watery butter!
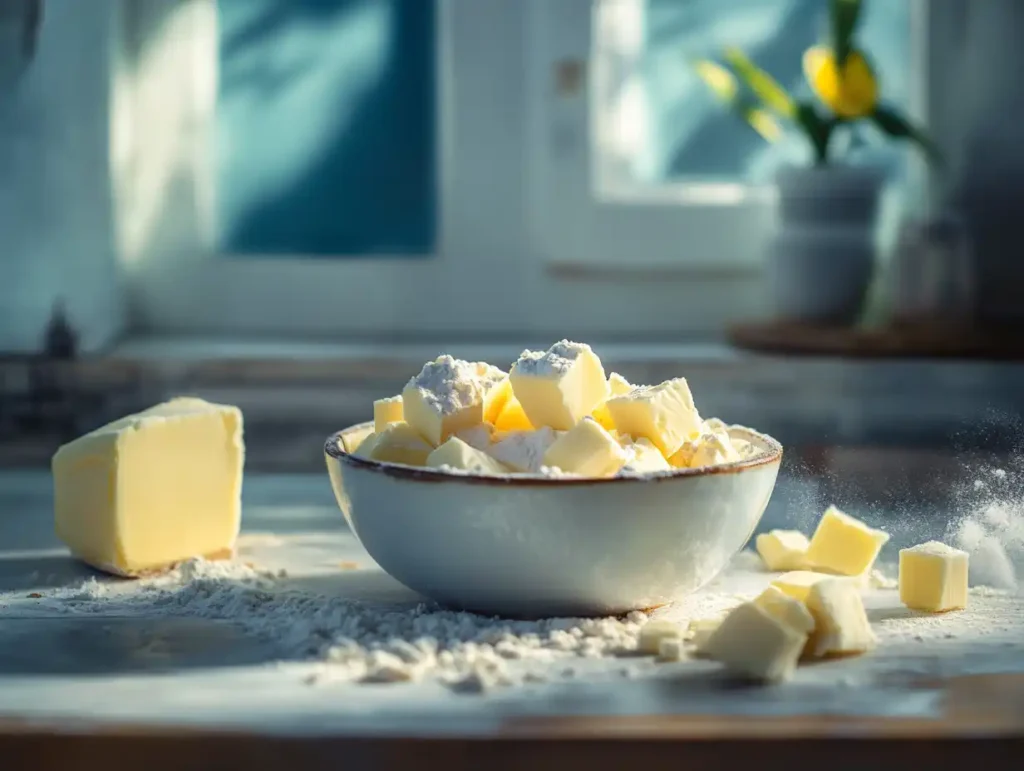
First off, pick a low protein flour, like all purpose or even cake flour. This ensures your scones stay tender and don’t get tough. Next, butter is the real MVP here. Always choose unsalted, high fat butter and keep it ice cold until the moment it hits the dough. The cold butter melts in the oven, creating those beautiful flaky layers we all dream about.
As for cream or milk, heavy cream adds luxurious moisture and a soft crumb. Skimp here, and you’ll definitely notice a difference. If you want more details on achieving that tender, bakery style crumb, check out this helpful Secret to Fluffy Scones guide!
Using the right ingredients is half the battle in unlocking the secret to baking perfect, soft scones.
How Leavening Agents Affect Texture
Now, let’s talk about leaveners, baking powder and baking soda. Without them, your scones would be dense, heavy lumps. Yikes!
Fresh baking powder is key because it loses its magic over time. For the best lift, use a baking powder that’s been opened within the last six months. Also, avoid adding too much, or your scones could taste bitter.
Sometimes, recipes call for a mix of baking soda and acidic ingredients like buttermilk. This combo gives your scones a delicate rise and slight tanginess that’s just… chef’s kiss!
Simply put, the secret to making good scones often hides in the freshness and balance of your leavening agents. Get that right, and you’re golden!
The Secret Techniques for Perfect Scones
Keeping Ingredients Cold: Why It Matters
Alright, here’s a golden rule if you’re serious about mastering what is the secret to making good scones: keep everything cold.
Cold butter is non negotiable. It creates tiny pockets of steam as it melts, which puff up the dough and create flaky layers. Warm butter? It’ll melt into the dough before it even hits the oven, leaving you with sad, flat scones.
To stay on the safe side, you can even chill your flour, your mixing bowl, and your baking sheet! Sounds a bit crazy, but trust me, it works wonders. If you love quick, no fuss recipes that still turn out amazing, you might enjoy learning How to Make Scones with Four Ingredients.
In the quest for that perfect scone texture, cold ingredients are your best friends.
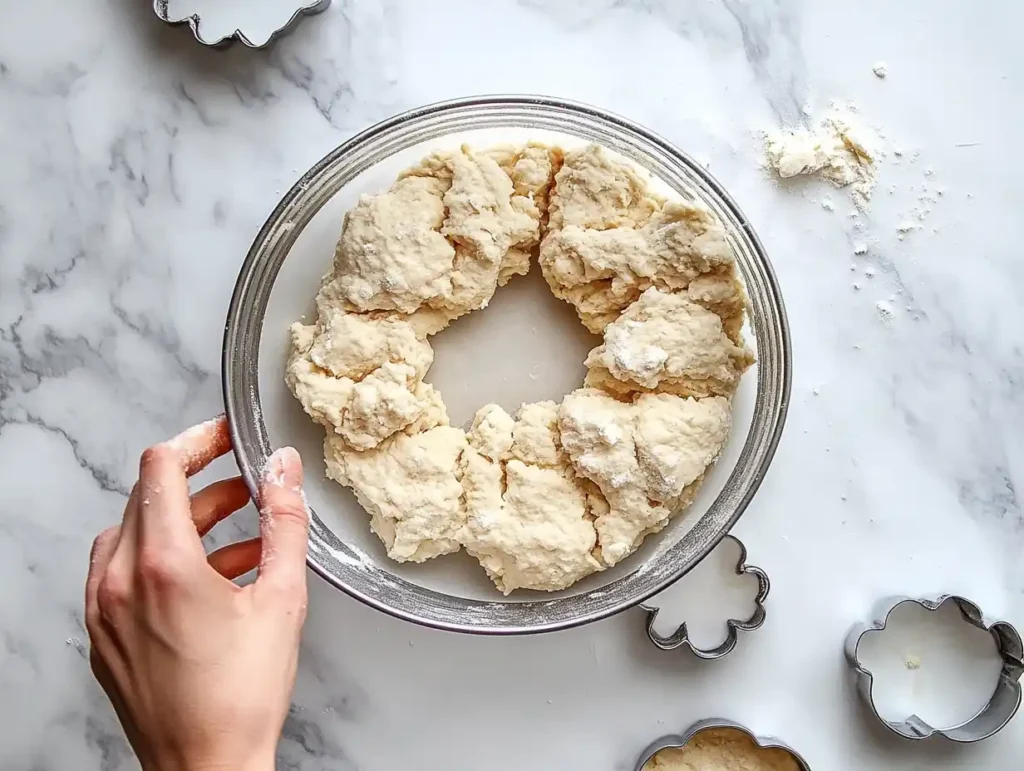
The Gentle Touch: Handling Dough Correctly
Handling the dough gently is where most folks stumble. But don’t worry, it’s easier than you think once you get the hang of it!
When you mix your dough, stop as soon as everything just comes together. It’s totally fine if it looks a little shaggy or messy. Overmixing develops gluten, making your scones tough instead of tender.
Also, when rolling out the dough, be gentle. Press it lightly with your hands rather than a heavy rolling pin. And resist the urge to twist your biscuit cutter, it seals the edges and prevents a proper rise.
Basically, the less you fuss with the dough, the lighter and flakier your scones will be.
So next time someone asks you what is the secret to making good scones, you can smile and say: “Keep it cool and keep it gentle!”
Common Mistakes to Avoid When Making Scones
Overmixing or Overkneading the Dough
If you’re still asking yourself what is the secret to making good scones, here’s another critical piece of the puzzle: don’t overwork the dough.
Seriously, it’s tempting to keep mixing until everything looks smooth and perfect, but that’s where many bakers go wrong. Overmixing develops too much gluten, which makes your scones chewy, not tender. And nobody wants rubbery scones, right?
As soon as your dough holds together, even if it looks a little rough, it’s time to stop. Less is more when it comes to handling scone dough. Always remember: a light touch makes a light scone!
Using the Wrong Baking Temperature
Another sneaky mistake? Baking at the wrong temperature.
Too low, and your scones will spread into sad puddles. Too high, and the outside will burn before the inside cooks. Ideally, you should bake scones at a high temp, around 400°F (200°C), so they get that quick, beautiful rise.
Preheating your oven is key, no shortcuts here! Otherwise, all your hard work could go to waste.
How to Flavor Your Scones Like a Pro
Best Add ins: Fruits, Nuts, and Flavorings
Once you master the basics, the real fun begins, customizing your scones!
Wondering what is the secret to making good scones that wow everyone? A big part of it comes down to choosing the right add-ins.
Popular choices include dried fruits like cranberries, raisins, and blueberries. Chopped nuts like pecans or walnuts also add lovely crunch and flavor. If you’re feeling fancy, you can even add chocolate chips, citrus zest, or herbs like rosemary for a savory twist!
But here’s a tip: don’t go overboard. Too many mix-ins can weigh the dough down and mess with the rise. About 1 to 1½ cups of add-ins for a standard recipe is the sweet spot.
Balancing Sweet and Savory Scones
Deciding between sweet or savory scones? You can absolutely have both, it just depends on your mood!
For sweet scones, adding a spoonful of sugar or a drizzle of glaze after baking takes them over the top. On the flip side, for savory scones, cutting back on sugar and adding a pinch of pepper, cheese, or chives creates a perfect snack or brunch option.
Getting the flavor balance right is a huge part of discovering the secret to making the best scones you’ll ever bake.
Step by Step Foolproof Scone Recipe
Ingredient List and Preparation Tips
Alright, so you’ve been wondering what is the secret to making good scones? The real magic happens when you combine all the right pieces, quality ingredients, gentle handling, and smart baking. And hey, you don’t have to be a master baker to get it right either!
Here’s a simple ingredient list to get you started:
- 2 cups all purpose flour
- 1 tablespoon baking powder
- ½ teaspoon salt
- 2 tablespoons sugar (adjust for sweeter scones)
- 5 tablespoons cold unsalted butter, cut into cubes
- ¾ cup heavy cream (plus extra for brushing)
- 1 egg
- Optional: 1 cup of add ins (berries, chocolate chips, etc.)
Pro Tip: Keep your butter and cream chilled until the very last second! Trust me, it makes all the difference.
Before you get mixing, preheat your oven to 400°F (200°C) and line a baking sheet with parchment paper. Always preheat, it’s a tiny step with a big payoff!
Step by Step Baking Instructions for Beginners
- Mix dry ingredients: In a large bowl, whisk the flour, baking powder, salt, and sugar together.
- Cut in the butter: Add the cold butter pieces. Using a pastry cutter or your fingers, work it into the flour until the mixture looks like coarse crumbs.
- Whisk wet ingredients: In a separate bowl, whisk together the cream and egg.
- Combine gently: Pour the wet mixture into the dry ingredients. Stir until it just comes together, it’s okay if it’s a little shaggy.
- Add mix-ins: Fold in fruits, chocolate, or nuts if you’re using them.
- Shape the dough: Turn the dough onto a lightly floured surface. Gently pat it into a 1-inch thick round. Cut into 8 wedges or use a round cutter for traditional scone shapes.
- Bake: Place the scones on the baking sheet, brush with extra cream, and bake for about 15–17 minutes until golden brown.
And there you go, bakery style scones right from your own kitchen! When you bake with care and patience, you’ll truly unlock the secret to perfect scones.
Expert Tips for Baking and Serving Scones
How to Achieve a Golden, Crisp Exterior
Ever admired those beautiful, golden scones at your favorite café? Well, you can make yours just as stunning!
Another nugget of what is the secret to making good scones lies in how you finish them before baking.
Brushing the tops of your scones with heavy cream or an egg wash (a beaten egg with a splash of water) helps achieve that glossy, golden crust. Don’t skip this step, it’s the cherry on top!
Also, placing your scones close together on the baking sheet can help them rise higher. The sides support each other as they bake, kind of like a team effort!
Serving Suggestions: Cream, Jam, and Tea Pairings
Now comes the best part, eating your freshly baked masterpieces!
Traditionally, scones are served with clotted cream and jam. Strawberry jam is a classic, but feel free to get creative with raspberry or even lemon curd for a zesty twist. And of course, a hot cup of English breakfast tea ties everything together perfectly.
Whether you love your scones sweet or savory, knowing what is the secret to making good scones truly enhances every bite. And honestly, once you nail the basics, the sky’s the limit!
FAQs About Making Good Scones
Why Are My Scones Dry and Crumbly?
If your scones are coming out dry or crumbly, chances are the dough was either overmixed or didn’t have enough moisture.
One big tip for what is the secret to making good scones is to stop mixing as soon as everything just holds together. Adding a touch more cream if the dough feels too dry can also work wonders.
Also, make sure your baking time isn’t too long. Overbaking can pull all the moisture right out of your beautiful scones.
Can I Freeze Scone Dough for Later?
Absolutely! Freezing scone dough is a total game changer.
After shaping your scones, pop them onto a baking sheet and freeze until firm. Then, store them in a freezer bag.
When you’re ready to bake, just add a few extra minutes to the baking time, no need to thaw.
Honestly, knowing this trick could easily become part of the secret to making scones easily and stress free.
How Do I Make Gluten Free or Vegan Scones?
Switching things up for gluten free or vegan diets is easier than you might think.
For gluten-free scones, use a good quality 1 to 1 gluten-free flour blend.
For vegan versions, swap the butter for vegan butter and use coconut cream or almond milk in place of dairy cream.
Tasty scones really are possible for everyone, you just need the right swaps!
Should I Use a Food Processor for Mixing?
You can, but be very careful!
Using a food processor often leads to overworking the dough if you’re not watching closely.
If you want to be extra sure you don’t overmix, using your hands or a pastry cutter is still the safer bet for tender, flaky scones.
Conclusion: Unlocking the Secret to Perfect Scones
If you’ve ever asked yourself what is the secret to making good scones, now you know, it’s all about quality ingredients, gentle handling, and baking with love!
By picking the right flour, keeping everything cold, and using a light hand when mixing, you’ll be well on your way to making bakery-worthy scones at home.
Throw in some fun flavors, bake at the perfect temperature, and don’t forget that final brush of cream for that gorgeous golden glow.
Baking scones might seem tricky at first, but with a little practice (and patience), you’ll be whipping up batches that would make any English tearoom jealous.
So roll up your sleeves, grab that cold butter, and let’s bake some magic!