Looking to whip up a warm batch of scones without the hassle of a dozen ingredients? You’re in for a treat. In this guide, we’ll walk you through exactly how to make scones with four ingredients, yes, just four! Whether you’re new to baking or simply short on time (and ingredients), this recipe will give you light, fluffy, bakery worthy scones in no time.
We’ll cover everything from choosing the right ingredients to shaping and baking your scones. You’ll also get practical tips, avoid common mishaps, and explore a few delicious twists to make this basic recipe your own. By the end of this article, you’ll feel confident turning your kitchen into a scone making haven.
Let’s get started with why this minimalist recipe works like magic.
Why Four Ingredient Scones Are a Game Changer
The Simplicity of Minimalist Baking
Let’s face it, sometimes, less really is more. When it comes to homemade British scones, using just four ingredients doesn’t mean sacrificing flavor or texture. In fact, stripping it down to the essentials often gives you a purer, more satisfying taste. No fancy add ins or hard to pronounce items, just simple pantry staples working their magic.
Not only is this kind of baking super convenient, but it also takes the pressure off, especially for beginner bakers or those baking with kids. It’s hard to go wrong when the ingredients are this straightforward. Plus, with fewer variables, there’s less room for error, always a win in the kitchen.
Benefits of Using Just Four Ingredients
The real charm behind learning how to make scones with four ingredients is the ease and speed of it all. We’re talking 10 minutes of prep and a single bowl. That’s faster than brewing a fancy cup of coffee!
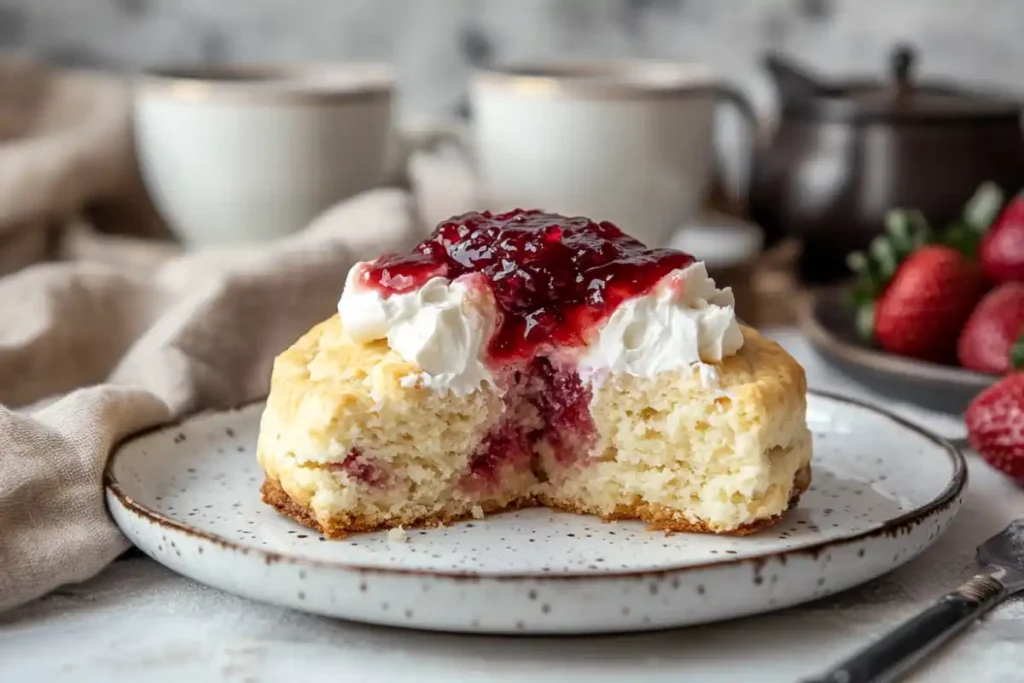
And don’t think basic means boring. These scones are light, fluffy, and beautifully golden with a delicate crumb. They’re a blank canvas, serve them plain, or jazz them up with a slather of butter, jam, or even clotted cream.
Best of all, this recipe is budget friendly, uses what you likely already have in your kitchen, and gives you that homey satisfaction of something made from scratch. Whether you’re hosting afternoon tea or just craving a warm treat, these four-ingredient scones hit the spot, every time.
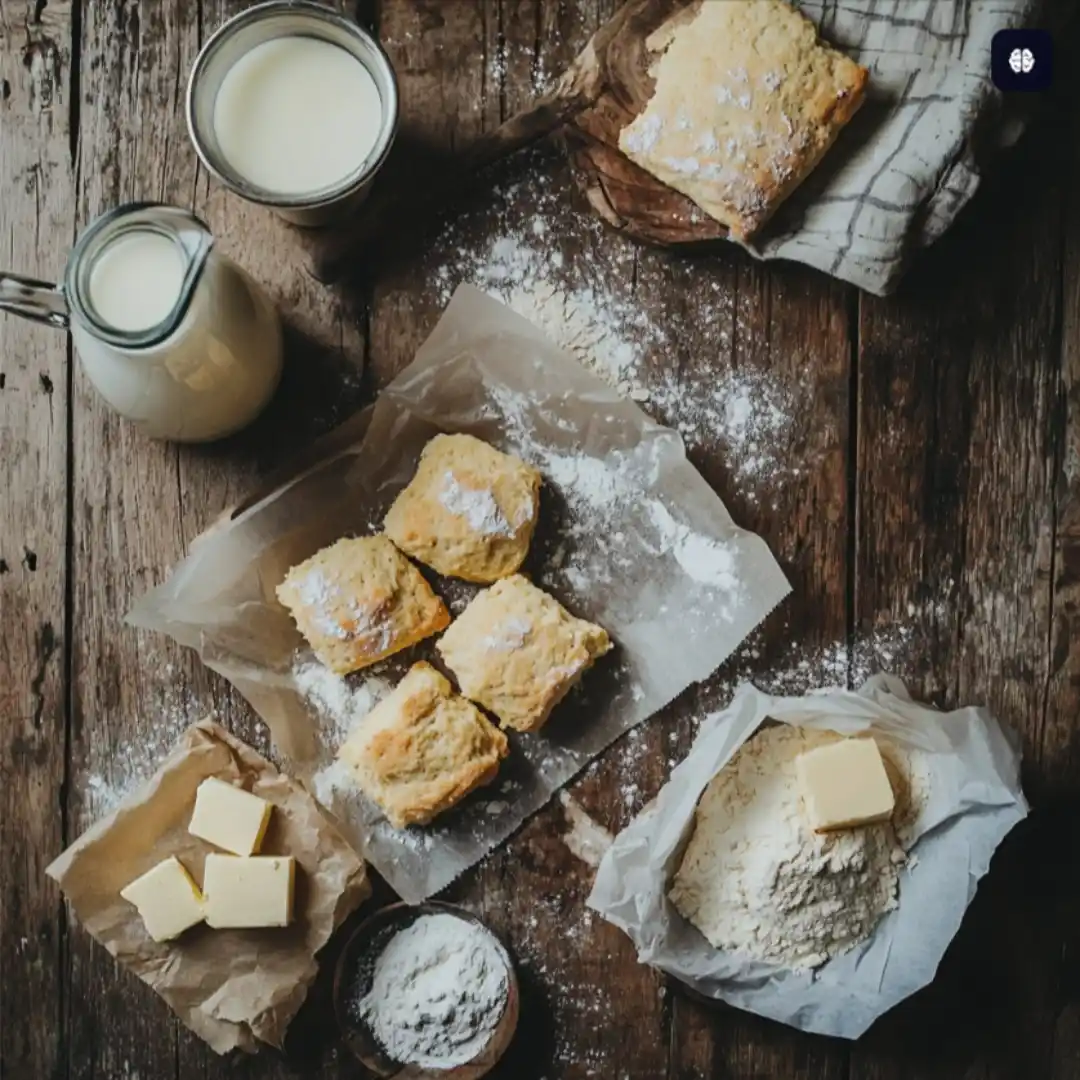
Essential Ingredients for Four-Ingredient Scones
Ingredient 1: Self Raising Flour or DIY Substitute
The backbone of any scone is self raising flour. This magical blend already includes leavening agents, saving you from needing baking powder separately. If you don’t have it on hand, no sweat, you can make your own. Simply mix 1 teaspoon of baking powder into each cup of plain flour. It works like a charm.
This flour gives your scones the lift they need to be tall, fluffy, and tender. Want to keep it gluten free? Go ahead and try a gluten free blend, just be sure it’s one designed for baking.
Ingredient 2: Cold Butter or Margarine Options
Butter is what brings the richness. It’s the ingredient that makes your scones melt in the mouth good. Be sure to use cold butter and cut it into small cubes before working it into the flour. The goal? A crumbly mixture that looks like coarse breadcrumbs.
If you’re out of butter, margarine works in a pinch. But if you’re after that buttery homemade scone flavor, real butter is the move.
Ingredient 3: Caster Sugar, How Much Is Enough?
You don’t need much. Just a tablespoon or so will do for that gentle hint of sweetness. You’re making scones, not cupcakes. Keeping the sugar light allows you to pile on the jam or clotted cream later without overpowering your tastebuds.
Ingredient 4: Milk, Full Fat vs. Semi Skimmed
Milk brings it all together into a soft dough. Both full fat and semi skimmed milk work well. Just be sure to pour it in gradually. Too much liquid and your dough turns into a sticky mess. Too little, and it won’t bind.
Pro Tip: Add a splash extra only if the dough seems too dry after mixing.
Related Tip: Curious about variations for younger bakers? Check out scone recipes for kids for simple, fun ideas that work perfectly with this base.
Step by Step Guide on How to Make Scones with Four Ingredients
Prepping Your Workspace and Tools
Before diving into the mixing, take a moment to get your kitchen ready. Preheat your oven to 200°C (400°F) and line a baking sheet with parchment paper. Grab a mixing bowl, a butter knife or spatula, a floured surface, and a fluted cutter, or just a glass if you’re improvising.
Prepping ahead makes the whole process smoother and more fun.
Mixing the Dry Ingredients: Flour + Butter Technique
Start by sifting your self raising flour into a large mixing bowl. Drop in the cold butter cubes and use your fingertips to rub it into the flour until it forms a coarse breadcrumb like texture. This step is key, it’s what makes the scones flaky. Lift your hands as you rub to aerate the dough. Don’t rush it; this step sets the stage for light and tender results.
Incorporating Sugar and Mixing in Milk Lightly
Now sprinkle in your caster sugar and mix gently. Then, pour in your milk slowly, stirring with a flat knife. The dough should just come together, no vigorous kneading here! Overmixing will give you tough, chewy scones, and nobody wants that.
If your dough feels a bit dry, add milk a tablespoon at a time. You’re aiming for a soft, slightly tacky ball that holds its shape.
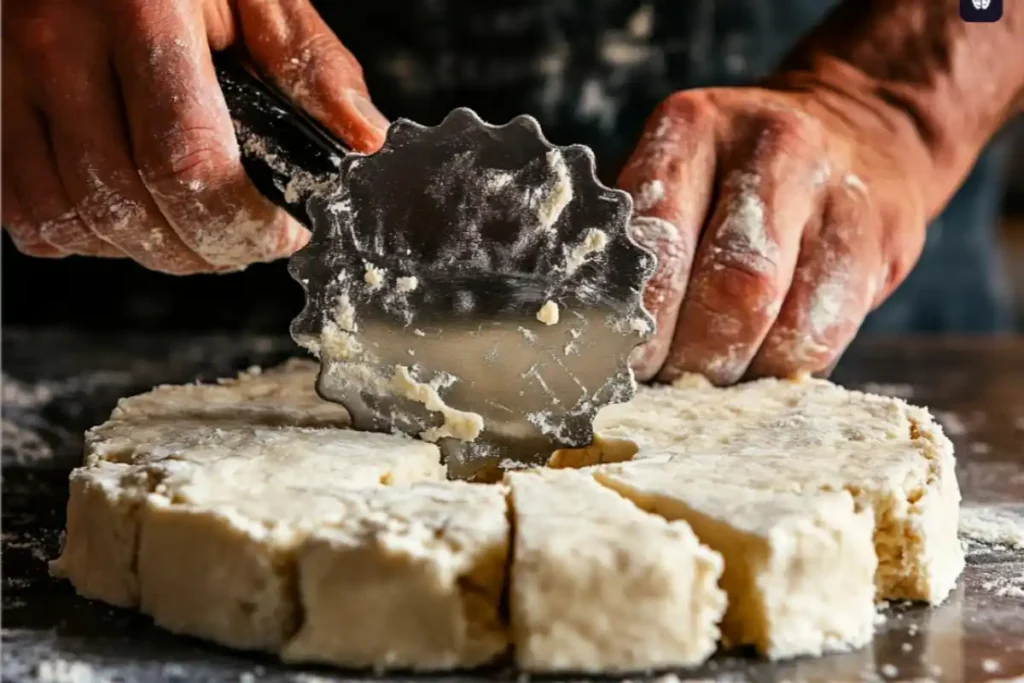
Shaping and Cutting: Why Less Handling Is More
Turn the dough onto a floured surface and press it gently, no rolling pin necessary. Shape it into a disc about 2 cm thick. Use your cutter or glass to cut out rounds. Be careful not to twist the cutter, this squashes the edges and stops the scones from rising evenly.
Gather the scraps, press them together, and repeat until you’ve used all the dough. Try not to handle the dough more than you need to, less is more.
Baking to Golden Perfection: Tips and Temperatures
Place the rounds on your baking sheet with a little space between each one. Brush the tops lightly with milk for that beautiful golden finish. Then pop them into your preheated oven for about 20 minutes.
When the scones are well risen and golden brown, they’re ready! Let them cool slightly before serving. Or better yet, slice one warm and smear on a little jam.
Bonus Tip: If you love keeping baked goods fluffy and soft, you might enjoy this helpful article on the secret to fluffy scones. It offers pro-level insights that pair perfectly with our four ingredient approach!
Common Mistakes to Avoid When Making Scones
Overmixing the Dough: Why It Kills the Rise
When learning how to make scones with four ingredients, one of the biggest traps is overmixing. It’s tempting to keep kneading until the dough is super smooth, but resist that urge! Overworking the dough activates too much gluten, which leads to tough, dense scones. And that’s not what you want.
Instead, stir only until the ingredients come together. A few floury streaks are perfectly okay. The less you touch the dough, the better the texture in the final bake.
Twisting the Cutter: The Mistake Everyone Makes
Here’s a small habit that can totally ruin your rise, twisting the cutter. When you press the cutter into the dough and twist, it seals the edges, stopping the scone from puffing up. Flat scones are a sad sight, so cut straight down and lift straight up. Simple change, big difference!
And don’t forget to keep your dough thick, at least 2 cm. Thin dough means thin scones, no matter how perfect your oven is.
Craving more foolproof baking tips? You might enjoy this ultimate guide to making soft cookies, especially if you’re into light, airy textures like our scones.
Serving Suggestions and Variations
Classic British Style: Cream First or Jam First?
There’s nothing quite like biting into a freshly baked scone, especially when it’s topped with jam and cream. But here’s the million-dollar question: what goes on first?
If you’re in Devon, tradition says cream first, then jam. In Cornwall, it’s the reverse, jam first, then a big dollop of clotted cream. Honestly, either way works. The only rule? Use the good stuff.
Pair your scones with a hot cup of tea or coffee, and you’ve got yourself a cozy treat that hits all the right notes.
Fruit or Cheese Add ins: When and How to Add Them
Even though we’re focusing on how to make scones with four ingredients, there’s always room to play once you’ve mastered the basics.
Want fruit scones? Toss in a handful of sultanas, raisins, or currants just before adding the milk. Prefer a savory twist? Try mixing in shredded cheddar and a pinch of black pepper. You can even sprinkle a bit of cheese on top before baking for an extra hit of flavor.
Another idea? Stir in orange zest or a dash of cinnamon to take things in a slightly sweet spiced direction. These simple tweaks turn a plain scone into something seriously crave worthy.
And remember, scones are best fresh out of the oven. But you can store them in an airtight container for up to three days or freeze them for later.
Tips for Perfect Scones Every Time
Why Cold Butter Matters
One of the golden rules when figuring out how to make scones with four ingredients is this: always use cold butter. Warm butter blends too easily and melts into the flour, which leads to greasy, flat scones. Cold butter, on the other hand, creates steam as it bakes, resulting in those irresistible flaky layers.
Want a shortcut? Freeze your butter for 10 minutes, then grate it into the flour. This trick not only saves time but also keeps everything chill, literally!
The ‘Flat Knife’ Mixing Trick
Stirring with a flat bladed knife instead of a spoon helps keep the dough airy. It mixes just enough without overworking. You’ll want to stop mixing as soon as everything comes together, don’t aim for perfection here. Slightly rough looking dough often makes the best homemade scones.
Another pro tip? Handle the dough as little as possible. The more you poke, press, or roll it, the tougher your scones can become. Press it out with your hands instead of a rolling pin to keep it light and fluffy.
And don’t forget: dough should be about 2 cm thick before cutting. Too thin, and your scones won’t rise; too thick, and they might bake unevenly.
Master these little tricks, and you’ll never wonder how to make scones with four ingredients again, they’ll turn out beautifully every single time.
Frequently Asked Questions (FAQ)
Can I make scones with only 4 ingredients?
Yes, absolutely! That’s the beauty of this recipe. If you’re wondering how to make scones with four ingredients, the answer is simple: flour, butter, sugar, and milk. These staples work together to create scones that are rich, tender, and perfect for any occasion. Plus, they leave room for creative add ins if you feel like jazzing them up.
What can I use instead of self raising flour for scones?
If you don’t have self raising flour, don’t stress. You can easily make your own by adding 1 teaspoon of baking powder for every cup of plain flour. Just sift them together before using to ensure an even rise. This works like a charm and keeps the recipe just as easy.
How do I stop my scones from being dry?
Dry scones are usually the result of too little milk or overbaking. Always add milk gradually and stop mixing once the dough holds together. Also, bake them until just golden, no longer. Serve with butter or jam for added moisture and flavor.
Why don’t my scones rise properly?
Flat scones can happen if your dough is too thin, your flour isn’t fresh, or you twist the cutter while cutting. Stick to cold ingredients, don’t twist, and ensure your dough is thick enough, around 2 cm. That’s the secret sauce for a great rise!